What if you could clone your favorite mature tree or shrub without cutting it down or waiting for seeds? This isn’t a fantasy for master gardeners; it’s the practical magic of air layering, a propagation technique with deep scientific roots. For home gardeners and plant enthusiasts struggling with woody ornamentals, fruit trees, or prized shrubs that stubbornly resist rooting from cuttings, this method is a game-changer. Our air layering and woody plant propagation guide demystifies the botany behind this reliable technique and translates it into a clear, actionable protocol. By understanding the simple plant physiology at play, you can successfully create genetically identical copies of your most valuable plants, bypassing the uncertainty of seeds and the high failure rate of traditional cuttings for woody species.
Air layering is a propagation technique for woody plants where you wound a stem, surround it with moist medium, and induce root formation while it’s still attached to the parent. This method is ideal for plants that are difficult to root from cuttings, as it provides a continuous supply of water and nutrients during the rooting process. Its core principle involves interrupting the flow of sugars in the phloem, which redirects the plant’s energy to form adventitious roots at the wound site. This makes it exceptionally effective for slow-to-root woody species where other woody stem propagation methods often fail.
The Science Behind Air Layering: Why It Works
At its core, air layering is a form of woody plant cloning that works by manipulating the plant’s own vascular system. To understand why it’s so effective, you need to know a little about how a tree or shrub moves resources around. Think of the stem as a two-lane highway running just under the bark.
The outer lane, called the phloem, transports sugars and other nutrients produced by the leaves down to the roots and other parts of the plant. The inner lane, the xylem, carries water and minerals up from the roots. Sandwiched between them is a thin, vital layer of cells called the cambium. This is the plant’s growth factory, responsible for producing new phloem and xylem cells.
The Trigger: Creating an Energy Detour
When you make a girdling cut in the air layering technique, you completely remove a ring of bark, which includes the phloem. This is the masterstroke. You’ve effectively created a roadblock on the sugar highway. Sugars from the leaves can no longer travel past the wound, so they accumulate just above it.
This sugar buildup, combined with natural plant hormones like auxin that also pool at the site, sends a powerful signal to the cambium cells: “We have energy here, but no clear path downward.” In response, the cambium switches its programming. Instead of making more bark or wood, it begins producing adventitious roots—roots that form from non-root tissue. The moist medium you provide gives these nascent roots a place to grow into, effectively creating a new, self-contained root system on the branch. For a deeper dive into cambium function, resources like the US Forest Service’s tree biology pages offer excellent foundational knowledge.
Essential Tools and Materials You’ll Need

Photo by Tima Miroshnichenko on Pexels
Successful air layering propagation doesn’t require fancy equipment, but using the right materials makes all the difference. Here’s your practical checklist:
- A Sharp, Sterile Blade: A grafting knife, razor blade, or sharp pocket knife. A clean cut is crucial for healthy callusing and prevents introducing disease.
- Rooting Hormone (Powder or Gel): While not always strictly necessary, a hormone containing IBA (Indole-3-butyric acid) significantly boosts root initiation, especially on harder-to-root species.
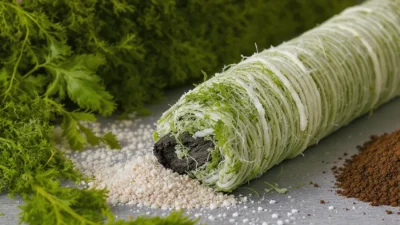
- Sphagnum Moss (Long-Fibered): The gold standard medium. It holds an incredible amount of moisture while remaining aerated, discouraging rot. Pre-soak it until it’s thoroughly damp, like a wrung-out sponge.
- Clear Plastic Wrap: Allows you to see root development without disturbing the setup. Polyethylene film or even a cut plastic bag works.
- Twist Ties, String, or Electrical Tape: To seal the ends of the plastic wrap tightly, keeping moisture in and contaminants out.
- Optional but Helpful: A small paintbrush for applying hormone, a spray bottle for remoistening, and a permanent marker for labeling with the date and plant name.
Why sphagnum? Its structure creates ideal air pockets around the wound, which is vital for rooting woody stems. Alternatives like coco coir can work but often compact more easily and retain less consistent moisture.
Your Step-by-Step Air Layering Protocol
This is your actionable guide to propagating woody plants through air layering. Follow these steps methodically for the best chance of success.
1. Selection & Preparation
Choose a healthy, pencil-thick to thumb-thick branch from the current or previous season’s growth. It should be flexible, not old and brittle. The ideal spot is 12-18 inches from the tip, with several leaf nodes present. Clear any leaves from a 4-6 inch section where you’ll work.
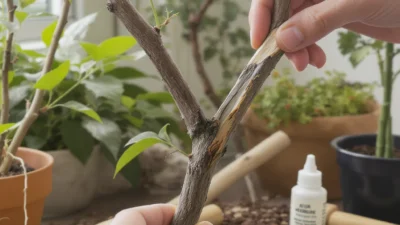
2. The Girdling Cut (The Critical Wound)
This is where you interrupt the phloem. Using your sterile blade, make two parallel cuts around the stem, about 1-1.5 inches apart. Then, carefully remove the ring of bark and the underlying green cambium layer between the cuts, scraping down to the hard, white wood (xylem). Ensure you’ve removed all the slippery green tissue; this is a common point of failure.

3. Applying Rooting Hormone
Lightly dust the exposed upper edge of the wound (just above the girdle) with rooting hormone. This is where the roots will initiate. Avoid dumping powder on the lower cut or the wood below.
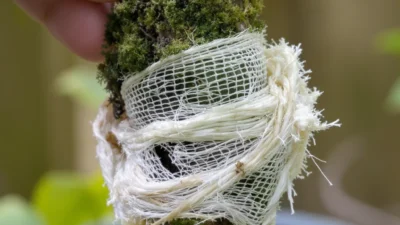
4. Packing & Wrapping
Take a generous handful of pre-soaked, wrung-out sphagnum moss. Encase the wounded area completely, forming a moist ball about the size of a baseball. Wrap this ball tightly with clear plastic wrap, ensuring no moss is exposed. Seal the top and bottom securely with ties or tape, creating a little humid greenhouse around the stem. Label it with the date.
Monitoring, Care, and Knowing When to Separate
After wrapping, the waiting game begins. Place the plant back in its normal growing conditions. Your job is to monitor and maintain.
The Waiting Period
Check the moss ball every few weeks by looking through the plastic. If it appears dry (light brown moss, no condensation), use a syringe or small hole to inject a little water and reseal. Resist the urge to open it frequently, as this disturbs the delicate root environment. Rooting time varies wildly: a fast-rooter like a Ficus may show roots in 6-8 weeks, while a slow woody magnolia or conifer can take 6 months to over a year.
Signs of Readiness
The layer is ready for separation when you see a dense network of white or light-colored roots clearly visible through the plastic, circling the moss ball. They should look vigorous, not sparse and brown. If you only see a swollen callus (a knobby growth) with no roots, it’s not ready.
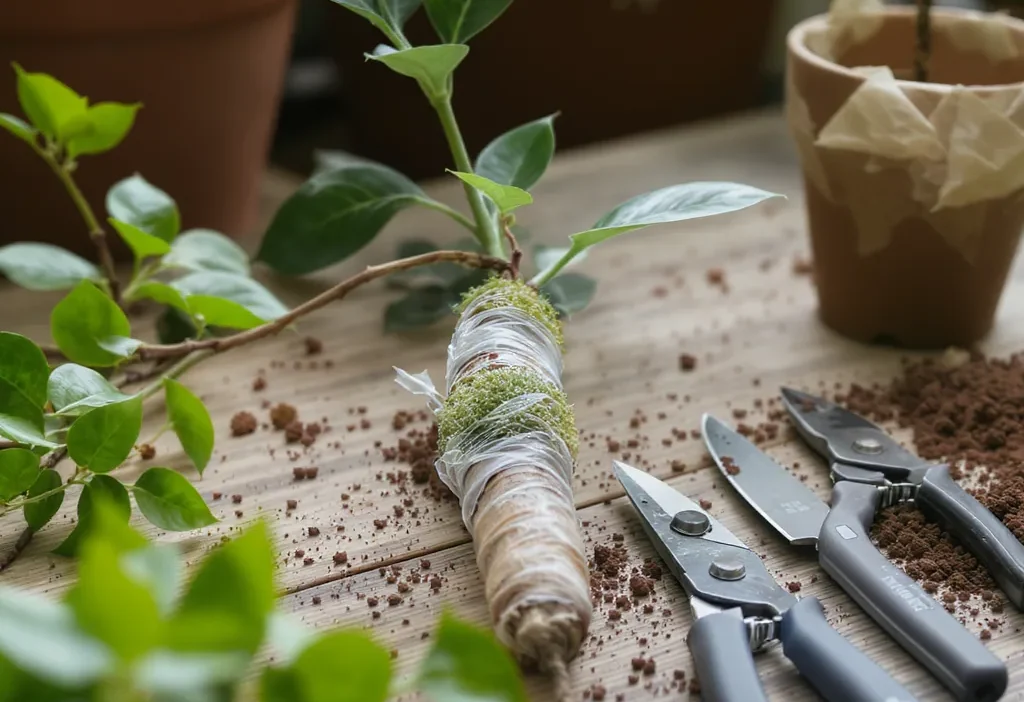
The Separation and Potting Process
Once well-rooted, make your cut on the parent plant side, just below the new root ball. Carefully remove the plastic, but try to keep the moss and root ball intact. Pot it up in a well-draining mix, keeping the soil consistently moist (not soggy) for the first few weeks. Provide bright, indirect light and consider tenting it with a plastic bag for a week or two to maintain high humidity as it transitions to life with its own, smaller root system.
Troubleshooting Common Air Layering Problems
Even with careful execution, things can go sideways. Here’s how to diagnose and fix common issues in your woody stem propagation methods.
No Root Formation After Many Months
Cause: Incomplete girdling (leftover phloem bridges), insufficient light on the parent plant (low energy), or a species that is exceptionally difficult to layer.
Solution: Unwrap and inspect the wound. If it has callused over without roots, re-scrape it clean, reapply hormone, and rewrap. Ensure the parent plant is healthy and in good light.
Mold or Rot in the Moss Ball
Cause: The medium was too wet when applied, the wrap is sealed too tightly preventing any gas exchange, or the sphagnum moss wasn’t fresh.
Solution: Unfortunately, if rot has set into the stem, the layer is likely lost. For surface mold, you can try carefully unwrapping, replacing the moss with fresh, barely-damp sphagnum, and rewrapping more loosely.
The Stem or Moss Dries Out Completely
Cause: Inadequate sealing at the ends of the plastic wrap, or simply forgetting to check on it during a hot period.
Solution: Rehydrate immediately by injecting water. If the stem itself appears shriveled, the layer may not recover. This highlights the importance of a secure, airtight seal during the initial wrap.
Callus But No Roots
Cause: The plant successfully sealed the wound (callused) but the hormonal signal to make roots wasn’t strong enough. This is common with weak rooting hormone or no hormone.
Solution: You can carefully scrape away the callus to expose fresh cambium, apply a stronger rooting hormone, and rewrap. Patience is key, as this resets the clock.
Mastering the Art of Patient Propagation
Air layering stands apart from other woody stem propagation methods because it respects the plant’s pace. It doesn’t demand that a cutting survive on its own immediately; instead, it provides a supportive bridge to independence. This method unlocks the ability to clone mature, prized specimens that would be impossible or painfully slow to propagate by seed or standard cuttings.
The decisive next step is to move from theory to practice. Select a candidate—a leggy houseplant Ficus, a cherished Magnolia branch, or a favorite Citrus tree—and apply the protocol. Your first attempt might feel tentative, but the moment you peel back the plastic to see a fistful of healthy, white roots you nurtured on a living branch, the “magic trick” becomes a tangible, deeply satisfying gardening skill.
This guide to air layering hinges on three core principles. First, the science: by girdling a stem, you interrupt the flow of nutrients (phloem), causing sugars and hormones to accumulate and trigger adventitious root growth at the wound site. Second, the process: success depends on a clean wound, the application of rooting hormone, a consistently moist medium like sphagnum moss, and an airtight seal with plastic wrap. Finally, the essential ingredient is patience. Rooting woody plants takes time, from several weeks to over a year, requiring careful monitoring without excessive disturbance. Master these pillars, and you can reliably clone a wide range of trees and shrubs.