You’ve done everything right: the dormant scion wood was perfect, your grafting knife was sharp, and you carefully aligned the cambium layers. For weeks, you’ve watched, hopeful. But now, the rootstock is erupting in wild, vigorous shoots, while the carefully grafted branch you selected remains a lifeless stick. That moment of quiet disappointment is a universal rite of passage for anyone who propagates plants. Whether it’s a failed cleft graft on an apple tree, a bud that never broke, or a cutting that rotted instead of rooting, these setbacks can feel like personal failures. But they are not endpoints—they are the most instructive part of the journey. This guide is your diagnostic companion for grafting, budding, and propagation troubleshooting. We’ll move you from frustration to understanding, systematically decoding what went wrong and how to fix it, so your next attempt is not just hopeful, but successful.
Effective grafting, budding, and propagation troubleshooting starts by systematically checking technique, environment, and aftercare. The vast majority of failures—from wilted scions to failed unions—can be traced to issues in one of these three critical areas. Success hinges on precise execution, controlled conditions, and vigilant post-op care; when a graft fails, it’s almost always because one of these pillars has cracked.
The Three Pillars of Propagation Success (And Where They Crack)
Before we dive into specific problems, it’s crucial to understand the framework that underpins every successful graft, bud, or cutting. Think of it as a three-legged stool: if one leg is weak, the whole thing collapses. For grafting budding and propagation troubleshooting, these three pillars are Technique, Environment, and Aftercare.
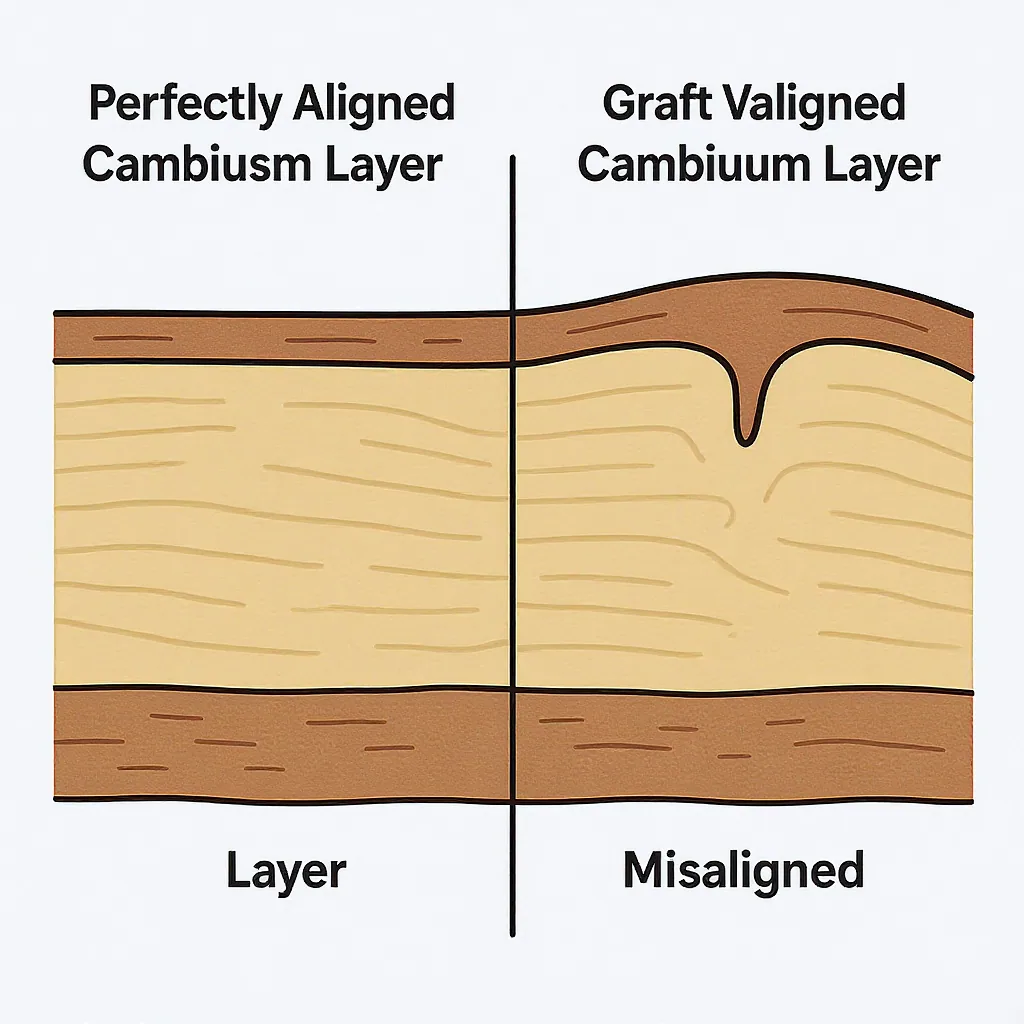
Technique is the precision of your cuts, the cleanliness of your tools, and the perfect alignment of the cambium layers—the thin, living tissue just under the bark where growth happens. A flaw here often means the union never forms. Environment controls the physical conditions around your wounded plant: humidity to prevent desiccation, stable temperature to encourage callusing, and gentle light to reduce stress. Aftercare is the vigilant management that follows—knowing when to water, when to remove ties, and how to manage the plant’s energy as it heals. Most failures in plant grafting basics and other methods can be traced directly to a breakdown in one of these three areas.
A Step-by-Step Diagnostic Flow for Failed Grafts and Buds
When a graft or bud shows no sign of life, don’t guess. Follow this systematic propagation troubleshooting guide to isolate the issue. This logical flow moves from immediate observations to deeper causes.

Phase 1: The Immediate Post-Op Check (Days 1-7)
In the first week, the primary threat is catastrophic failure due to technique or initial shock.
- Scion/Bud Condition: Is it already shriveled, black, or mushy? This points to severe desiccation, disease introduced during the operation, or tissue that was already dead.
- Security: Are the ties or tape holding firm without cutting into the bark? A shifting scion is a failing scion.
- Environmental Control: Is your humidity dome or bag creating condensation? No moisture inside often means the air is too dry, wicking life from the delicate union.
Phase 2: The Union Inspection (Weeks 2-4)
This is when the magic of callus formation and cambium bridging should be visible.
- Callus Formation: Gently probe near the union (without breaking it apart). Do you see swollen, knobby, light-colored tissue (callus) forming around the cut? No callus suggests poor contact or inactive material.
- The Black Line: If you see a distinct dark, sunken line at the graft junction, this often indicates necrotic tissue and a failed union, usually from disease or incompatible layers dying back.
- Bud Status: For bud grafts, does the bud shield look plump and green, or dry and brown? The leaf petiole (if left on) should fall away with a gentle touch if the bud is taking.
Phase 3: The Long-Term Vigor Test (Month 2+)
Sometimes the union holds, but the plant’s energy tells a different story.
- Scion Growth: Does the scion have swollen buds or new, vigorous shoots? Stunted, yellowing leaves on a live scion point to a weak vascular connection or rootstock incompatibility.
- Rootstock Dominance: Is the rootstock sending up a flood of suckers below the graft while the scion languishes? This is a classic sign the rootstock is rejecting the scion or the scion is too weak.
- Overall Stability: Does the union flex or snap easily? A strong union will be solid and show bark continuity over time.
Your Diagnostic Toolkit: Quick Checks
- Scratch Test: Gently scratch the bark of the scion with your thumbnail. Green underneath means it’s still alive; brown means it’s dead.
- Flex Test: After 4-6 weeks, apply very slight sideways pressure to the scion. A successful union will feel firmly attached, not wobbly.
- Observe the Leader: On a successful graft, the terminal bud of the scion is usually the first to break and grow most vigorously.
Decoding the Symptoms: What Your Plants Are Telling You
Plants communicate their distress through clear symptoms. Here’s how to translate them and connect them back to the three pillars.
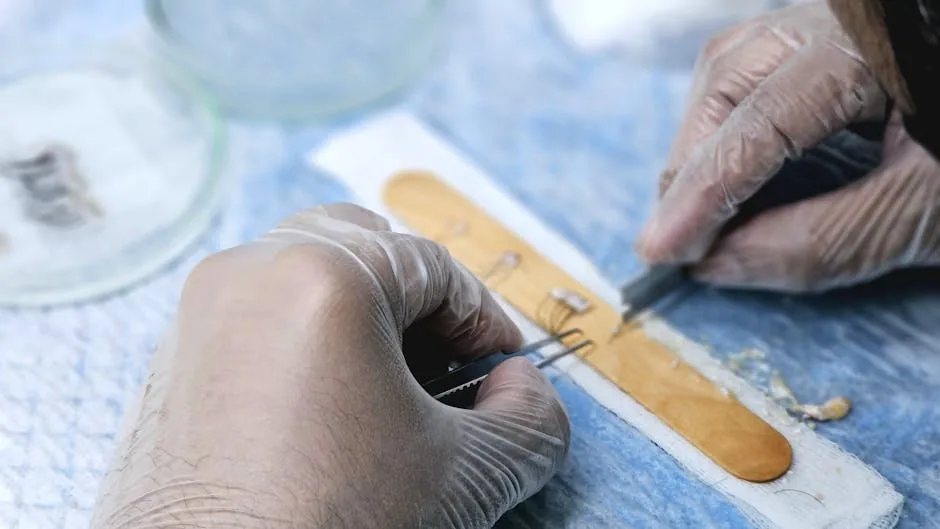
Photo by Muhammad Khawar Nazir on Pexels
Symptom: Scion Wilted or Shrivelled Within Days
Likely Causes: 1) Desiccation: The cambium layers dried out before callusing, due to low humidity or slow work. 2) Poor Cambium Contact: The scion and rootstock never made a sufficient living-tissue connection. 3) Diseased Material: Bacteria or fungi introduced via dirty tools invaded the wound.
Corrective Action: Improve humidity immediately for future attempts. Re-examine your cutting technique for speed and precision. Sterilize tools between every cut with isopropyl alcohol or a bleach solution.
Symptom: Black, Sunken Line at the Graft Union
Likely Causes: 1) Incompatibility: The scion and rootstock are genetically too distant, causing tissue rejection. 2) Phloem/Necrosis: A layer of dead cells formed, blocking nutrient flow, often from a ragged cut or improper pressure.
Corrective Action: Verify species/variety compatibility before grafting. Ensure cuts are single-stroke and smooth, not crushed. If the rootstock is healthy, you can often re-graft above the failed line.
Symptom: Plenty of Callus, But No Scion Growth
Likely Causes: 1) Dormant Scion Wood: The scion wasn’t collected while properly dormant, or it was stored incorrectly and lost vitality. 2) Bud Damage: The buds on the scion were damaged by handling, drying, or improper tying. 3) Energy Siphon: Rootstock suckers are diverting all energy.
Corrective Action: Source scion wood from healthy, dormant trees and store it cool and moist. Be meticulous when handling and tying to protect buds. Aggressively remove all rootstock suckers.
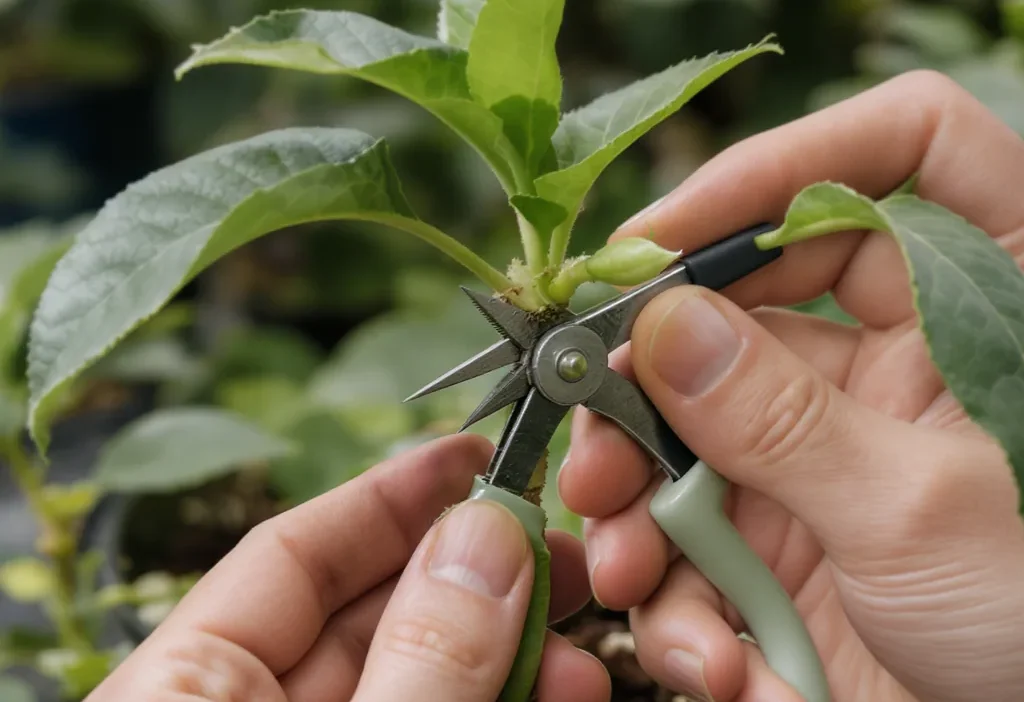
The Unforgiving Hour: Critical Mistakes in Technique
This is where many plant grafting mistakes are made, in the moments of cutting and joining. Precision is non-negotiable.
Do This / Not That
DO use razor-sharp, sterilized blades (a grafting knife or fresh single-edge razor). NOT a dull pocket knife or pruners, which crush cells and invite disease.
DO make a single, smooth, sloping cut. NOT a sawing motion that creates a ragged surface the cambium can’t bridge.
DO align the cambium layers on at least one side, perfectly. NOT center the scion in the middle of the rootstock if the bark thickness differs—align the inner edges.
DO wrap with consistent, firm pressure using grafting rubber or tape. NOT tie so tightly you strangle the union or so loosely it shifts.
DO insert a T-bud with a gentle slide to avoid wrinkling the bark shield. NOT force it in, which damages the delicate cambium.
Consider the common scenario of a whip-and-tongue graft failing: the maker often focuses on interlocking the tricky “tongues,” but if they don’t first ensure the long sloping cuts are perfectly flat and matched, the elaborate tongue becomes irrelevant. The cambium on the main faces must meet.
Environmental Saboteurs: Humidity, Temperature, and Light
You can execute a flawless graft, only to have it fail because its healing environment was hostile. Managing these factors is a core part of propagation troubleshooting.
Humidity: The Double-Edged Sword
The Problem: Fresh grafts have no roots to take up water, so they lose moisture through the cut surfaces. Low humidity causes fatal desiccation.
The Fix & Pitfall: Use a humidity dome, plastic bag, or grafting wax to maintain near 100% humidity for 1-2 weeks. However, stagnant, wet air on foliage invites fungal rot. Ensure some air exchange and keep the covering off any leaves.
Temperature: The Growth Catalyst
The Problem: Callus cells form most rapidly within an optimal temperature range (often 70-80°F / 21-27°C). Too cold, and the process stalls; too hot, and the scion cooks or uses its reserves too fast.
The Fix: Place grafts in a location with stable, warm temperatures. A heat mat set for the root zone can be beneficial for many species, but avoid direct heat on the scion itself.
Light: The Silent Stressor
The Problem: Bright, direct light increases transpiration (water loss) and raises tissue temperature, stressing the fragile union.
The Fix: Provide bright, indirect light or dappled shade for the first few weeks. Once the scion is actively growing, you can gradually acclimate it to stronger light.
Aftercare Pitfalls: The First 60 Days Determine Everything
The job isn’t done when the tape goes on. Neglect or misguided care in the following weeks can undo perfect work.
Watering: The Delicate Balance
DO keep the rootstock’s soil consistently moist but not waterlogged. A stressed rootstock cannot support a healing scion. NOT splash water onto the graft union itself, especially if it’s not fully sealed.
Managing Growth: Directing Energy
DO ruthlessly remove any buds or suckers that emerge from the rootstock. Every bit of energy diverted here is stolen from the scion union. NOT allow the rootstock to leaf out fully below the graft.
Releasing the Union: Timing is Key
DO cut or loosen non-biodegradable ties (like tape) once the union is visibly swollen and callused, usually after 4-8 weeks, to prevent girdling. NOT remove ties too early, risking a break, or too late, causing permanent damage as the stem expands.
DO wait to apply any fertilizer until the scion has several inches of new, mature growth. A gentle, balanced feed can then support it. NOT fertilize immediately, which can push the rootstock to sucker or burn tender new roots.
Material Matters: Selecting Scion, Rootstock, and Cuttings
Some failures are predetermined by the quality and compatibility of the plant material you start with. Understanding this is a fundamental plant grafting basic.
Scion & Cutting Vitality
Wood must be healthy, disease-free, and collected at the right physiological stage. For most deciduous fruit trees, this means fully dormant one-year-old wood collected in winter. For many ornamentals propagated by cuttings, semi-hardwood from the current season’s growth is ideal. Woody, brittle, or pithy scions often fail.
Rootstock Compatibility and Health
The rootstock must be compatible (within the same genus or closely related species for a high success rate) and actively growing or ready to break dormancy. A weak, pot-bound, or diseased rootstock lacks the vigor to support healing and new growth. Research your specific combination; for example, not all apple varieties graft equally well onto all apple rootstock types.
Seasonal Timing
Timing is material-adjacent. Bark grafting (like T-budding) requires the rootstock’s bark to be “slipping” (easily separates from the wood). This happens during active growth in late spring/early summer. Whip-and-tongue grafting is done late winter/early spring when both pieces are dormant but will soon grow. Attempting a method out of season is a common, easily avoided mistake.
Salvage vs. Scrap: Making the Call on a Failed Attempt
Not every failed graft is a total loss. Knowing when to intervene or start over saves time and heartache. Use this decision framework.
Try to Salvage (Re-graft) if: The rootstock is healthy and vigorous, the failure was clearly due to a technical error (e.g., scion dried out, bad alignment), and you are still within the optimal grafting season for your area. You can often cut off the failed scion and make a new graft on the same rootstock, moving slightly higher if needed.
Wait and See if: The scion is still green via the scratch test but simply hasn’t budded out, and the union looks clean. Some varieties are notoriously slow to break bud. Give it another 2-4 weeks of consistent care.
Scrap and Start Over if: The rootstock is diseased or severely weakened, the union shows a deep black crack or rot, or you’re now outside the viable grafting window. It’s more efficient to begin anew with fresh, healthy material than to nurse a compromised plant. This isn’t failure—it’s a practical reset with valuable lessons learned.
Building Your Propagation Intuition
The goal of grafting budding and propagation troubleshooting isn’t just to fix one failed attempt, but to build the intuitive sense that prevents future failures. Each wilted scion or black union line is a data point, teaching you about cambium alignment, local humidity, or plant vitality. Start viewing your propagation bench not just as a production line, but as a living laboratory.
Embrace small, labeled experiments: try two different wrapping materials on the same batch, or graft the same scion onto two rootstock sizes. Keep a simple journal noting dates, techniques, and outcomes. This record transforms guesswork into knowledge. Finally, connect with other growers—online forums and local horticultural societies are treasure troves of shared, hard-won experience. Your next “failure” might just be the breakthrough that teaches you, and others, the most.
Successful propagation hinges on three pillars: Technique (clean, precise cuts with perfect cambium alignment), Environment (high humidity, stable warmth, indirect light), and Aftercare (judicious watering, sucker removal, and timely tie release). When troubleshooting, systematically diagnose by first checking the scion’s vitality, then the union site, and finally the environmental conditions.
Shift your mindset: a failed graft is not an endpoint but a diagnostic opportunity. By decoding symptoms—like a black union line (often incompatibility) or a live scion with no growth (often rootstock dominance)—you build the practical knowledge that leads to consistent success. Remember to start with healthy, compatible material and let patience guide your aftercare.
Q: Can you regraft onto a failed graft union?
A: Often, yes. If the rootstock is healthy and the failure was above the union line (e.g., a dead scion), you can cut back to clean wood and re-graft, preferably in the same season. If the failure involved rot or disease at the union itself, it’s safer to start with a new rootstock to avoid lingering pathogens.
Q: How long should I wait before declaring a graft dead?
A: For spring grafts, give it at least 4-8 weeks. Perform the “scratch test” on the scion bark; if it’s brown and dry underneath, it’s dead. If it’s still green but hasn’t budded out, it may just be slow. For summer buds, they should remain plump and the shield green; they may not grow until the following spring, but they should not shrivel or blacken.
To put this into practice, check Layering and Air Layering Propagation Methods Explained.