You’re admiring your garden when you notice it: that once-vibrant clump of daylilies or hostas has transformed into a dense, flowering-choked mass, its center sparse and tired. This isn’t a sign of failure, but a quiet invitation. Your plant is telling you it’s ready to be generous. Plant division and clump splitting is far more than a mere chore; it’s a profound act of garden stewardship that rejuvenates your plants, controls their spread, and multiplies your investment into vibrant new starts. This guide cuts through the uncertainty, providing you with a clear, actionable checklist and trusted techniques to confidently approach this rewarding propagation method. Whether you’re dividing plants for propagation to fill new beds or managing an overgrown perennial, the process is a cornerstone skill for any gardener looking to cultivate abundance.
Plant division is the simple process of splitting an established plant’s root ball and crown into multiple pieces, each with its own shoots and roots, to propagate new plants, control size, and rejuvenate growth. The core steps involve lifting the plant, separating the clump, and replanting the divisions promptly. For most perennials, the best times are early spring as new growth emerges or in the fall as plants go dormant, using sharp, clean tools like a spade or garden knife to ensure clean cuts and minimize damage.
Your Pre-Division Checklist: Timing, Tools & Plant Selection
Successfully dividing plants for propagation starts long before you put a spade in the ground. Rushing in is the fastest way to stress both you and your plants. Instead, run through this mini-checklist to ensure you’re set up for a smooth, successful operation.

1. Pick the Right Plant & Time
Not every plant is a good candidate. Focus on herbaceous perennials that form clumps or spread via rhizomes. Classic examples include hostas, daylilies, ornamental grasses, asters, and coreopsis. The goal is rejuvenating crowded plants that have become dense in the center with reduced flowering.
Timing is everything. For most perennials, the two golden windows are:
- Early Spring: Just as new growth emerges from the soil. This gives divisions a full season to establish roots before winter.
- Early Fall: At least 4-6 weeks before the first hard frost. Cooler temperatures and autumn rains reduce transplant shock and encourage root growth.
Avoid dividing during the heat of summer or when plants are in full bloom, as they’re directing energy to flowers, not roots.
2. Assemble Your Toolkit
Using the right, clean tools makes the job easier and healthier for your plants. Dull or dirty tools can crush stems and introduce disease. Your kit should include:
- A sharp, flat-edged spade for digging and lifting.
- Two garden forks (for prying apart fibrous roots).
- A sturdy, sharp knife (for slicing through tough root balls and rhizomes).
- A trowel for planting smaller divisions.
- A hose or bucket of water for rinsing soil and hydrating divisions.
- Burlap or a tarp to hold the plant and keep your workspace tidy.
The Core Division Protocol: Lifting, Splitting & Replanting
This is the hands-on heart of your plant division and clump splitting guide. While the specific technique varies slightly by root type, the universal sequence is the same: lift, split, and replant. The key is to work with confidence and care.

Step 1: Lift the Plant
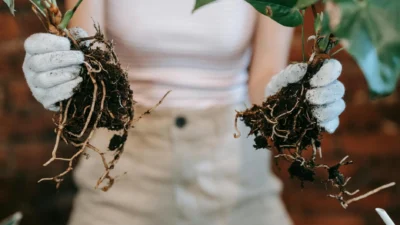
On a cool, overcast day, water the plant thoroughly a day before. Use your spade to dig a wide circle around the plant’s drip line, then slide the spade underneath the root ball to loosen it. Gently lift the entire clump onto your tarp. Shake or hose off excess soil so you can clearly see the root structure and natural separation points.
Step 2: Choose Your Splitting Method
This is where you assess the root type to choose the best tool for split root ball plants.
- For Fibrous, Matted Roots (e.g., Daylilies, Grasses): Often, you can pull sections apart with your hands. For tougher clumps, insert two garden forks back-to-back into the center and pry them apart. This technique tears the roots cleanly with minimal cutting.
- For Dense, Woody Crowns or Rhizomes (e.g., Irises, Hostas): A sharp knife or even a small saw is necessary. Identify healthy sections with at least 3-5 growing points (shoots or “eyes”) and a robust bundle of roots. Make clean, decisive cuts. Discard any old, woody, or diseased center portions.
Every division must have both shoots (top growth) and roots (bottom growth) to survive. A division that’s too small may struggle, while one that’s too large defeats the purpose of propagation.
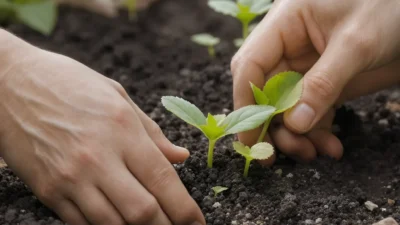
Step 3: Replant Immediately
Have your new planting holes ready before you make the divisions. Amend the soil with compost if needed. Plant each division at the same depth it was originally growing, firm the soil around it, and water deeply to settle the roots and eliminate air pockets. This immediate care is non-negotiable for success.
Troubleshooting Your Divisions: From Wilting to Slow Growth
Even with perfect technique, divisions can sometimes protest. Don’t panic—most issues are fixable. Here’s how to diagnose and solve common post-division problems.
Problem: Transplant Shock (Wilting, Drooping)
The Fix: This is the most common reaction. Ensure the plant is well-watered (but not soggy) and provide temporary shade for a few days using a shade cloth or even an upturned laundry basket. Avoid fertilizing, as this stresses roots further. The plant should perk up as new roots form.
Problem: Division Fails to Thrive or Dies
The Fix: First, check if the division had enough roots. Gently dig around the base. If it’s loose and has few roots, it was likely too small. Next, ensure it wasn’t planted too deep, which can smother the crown. Finally, rule out overwatering, which leads to root rot—the soil should be moist, not waterlogged.
Problem: Pest or Disease Attack
The Fix: Freshly divided plants can be slightly more vulnerable. Keep the area free of debris, water at the base to avoid wet foliage, and monitor for slugs or aphids. Good sanitation with clean tools during the division process is your first line of defense. If you see signs of fungal disease, a fungicide labeled for ornamental plants may be necessary.
Common Division Mistakes (And How to Avoid Them)
Learning from others’ errors can save your plants. Here are the most frequent missteps gardeners make when splitting plant clumps and the simple corrections to ensure your efforts pay off.
Mistake: Dividing at the Wrong Time
The Fix: Sticking to the spring and fall windows is crucial. If you must divide in summer, do it on a cool, cloudy evening and be relentless with aftercare (shade and water).
Mistake: Making Divisions Too Small (“Nosegays”)
The Fix: Greed is a common pitfall in propagating by division. That tiny piece with one shoot might not have the energy reserves to regenerate. Aim for robust sections with multiple growth points and a hearty root mass. It’s better to have three strong new plants than ten weak ones.
Mistake: Using Dull or Dirty Tools
The Fix: A clean, sharp cut heals faster and is less susceptible to disease. Wipe blades with a disinfectant (rubbing alcohol or a 10% bleach solution) between plants, especially if dealing with any suspect material.
Mistake: Neglecting the “Water-In”
The Fix: That initial deep watering is not a suggestion. It settles the soil, hydrates roots, and is critical for establishment. Don’t just sprinkle the surface—water slowly and deeply until the ground is saturated.
Mistake: Planting in Unimproved Soil
The Fix: Your divisions are starting over. Give them a boost by mixing a few handfuls of compost into the backfill soil. This improves drainage and provides gentle nutrients, encouraging strong new growth.
Beyond the Basics: Special Cases & Advanced Tips
Once you’ve mastered dividing standard perennials, you can apply the principles to trickier situations and use the technique for greater garden impact.
Dividing Woody Shrubs & Sub-Shrubs: Some, like spirea or lavender, can be divided, but it’s more advanced. The process is similar, but the woody roots require a sharp saw. Do your research on the specific plant first, as many shrubs propagate better from cuttings.
Dealing with a Monolithic Root Ball: For an extremely congested plant, don’t be afraid to be assertive. Use a sharp spade to literally chop the lifted clump into manageable wedges before further refining them with a knife.
The “In-Situ” Split: For very large, established clumps, you can sometimes divide without lifting the whole plant. Dig out a section from the outer edge of the clump with a spade, leaving the parent plant in place. Backfill the hole with soil, and replant the division elsewhere. It’s a less invasive method for mature specimens.
Instant Gratification Gardening: Use divisions to create immediate impact. Line a walkway with newly split lavender, or fill a bare border with chunks of ornamental grass. This method of propagating by division is far faster and cheaper than growing from seed or buying new plants.
Your Garden Awaits Its Transformation
Plant division is more than just a gardening task; it’s a cycle of renewal that puts you in direct conversation with your landscape. It turns a single overgrown perennial into a source of new life, filling gaps, sharing beauty with friends, and restoring vigor to your garden’s foundation.
The process demystified in this plant division and clump splitting guide is a fundamental skill that builds confidence. You’re not just cutting a plant apart—you’re reading its structure, making strategic decisions, and facilitating new growth. The reward is a garden that feels more abundant, balanced, and personally cultivated.
So, take that decisive next step. Walk your garden now, with a critical eye, and identify one plant that has become too crowded, too sparse in the center, or simply too dominant. Mark it in your mind for the coming appropriate season. When the time is right, you’ll have the knowledge to approach it not with hesitation, but with the assured hand of a gardener who knows how to multiply beauty.
Dividing plants is a straightforward, rewarding method to propagate new plants, control size, and rejuvenate overgrown perennials. The core principle is to split an established plant’s root ball and crown into healthy sections, each with its own shoots and roots. Success hinges on timing (early spring or fall), using sharp, clean tools, and providing immediate replanting and thorough watering. Avoid common pitfalls like making divisions too small or working in the peak summer heat. With this technique, you can expand your garden, improve plant health, and enjoy a more vibrant landscape with minimal cost.
For more detail, see Division and Offset Propagation Methods for Faster Plant Multiplication.