Why do your cuttings keep dying before they even have a chance? If you’ve felt the quiet disappointment of checking a propagation jar only to find a mushy stem or a wilted leaf, you’re not alone. Early propagation failure is a universal rite of passage for plant lovers, but it doesn’t have to be a mystery. The frustration usually boils down to a handful of common culprits—rot from excess moisture, dehydration from insufficient humidity, or simply starting with the wrong material. This guide cuts through the guesswork. We’ll walk you through a simple diagnostic flow to pinpoint exactly why plant propagation fails for you, then pair each problem with the safest, most forgiving fixes designed for beginners. Consider this your troubleshooting manual to turn those failed attempts into rooted success.
Most early propagation failures stem from a few key issues: using unhealthy parent material, incorrect moisture balance (leading to rot or dehydration), insufficient light for photosynthesis, and lack of patience. The safest beginner fix is to start with a simple, forgiving method like water propagation for pothos or spider plants to build confidence. Early propagation fails typically because of rot from overwatering, dehydration from under-misting, or using weak cuttings. The safest fix for beginners is to switch to water propagation for resilient plants like pothos to control moisture and observe root growth directly.
The Root of the Problem: Diagnosing Early Failure
Before you can fix a problem, you need to know what you’re dealing with. Early propagation failure causes usually fall into one of three clear categories. Use this simple diagnostic flow to match your cutting’s symptoms to the likely culprit. Early propagation failure causes

Symptom: Mushy Stem or Black, Rotting End
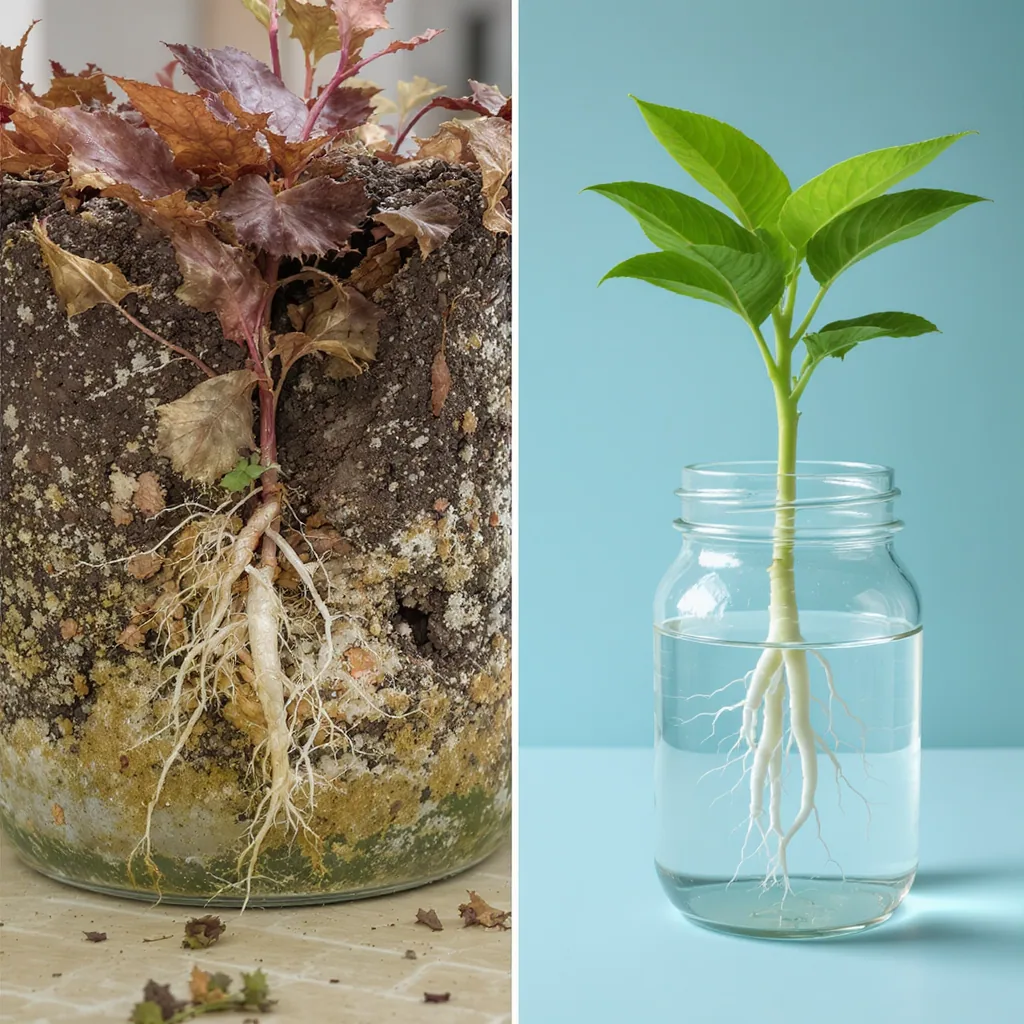
If the base of your cutting feels soft, slimy, or has turned dark brown or black, you’re looking at rot. This is the most common killer of new cuttings. It’s a sign of too much moisture and not enough oxygen around the stem, creating a perfect environment for bacteria and fungi to attack the wounded tissue. This is a classic sign of rooting problems that never even got started.
Symptom: Wrinkled, Crispy Leaves or a Shriveled, Dry Stem
Your cutting looks parched. Leaves are limp, wrinkled, or turning crispy at the edges, and the stem might be shriveling. This is straightforward dehydration. While the cutting has no roots to drink water from the soil, it relies on moisture stored in its leaves and stem. Without adequate humidity in the air around it, that moisture evaporates faster than it can be replaced, leading to a slow, dry demise.
Symptom: Looks Healthy But Absolutely No Root Development
This is the frustrating one. The cutting still looks green and firm, weeks have passed, but there’s zero root activity. This stagnation points to environmental factors or a simple lack of patience. The cutting might not be getting enough warm, indirect light to fuel photosynthesis and signal root growth, or the node (the growth point) wasn’t properly included. Sometimes, it’s just a slower-rooting plant testing your resolve. Note: This guide is for educational troubleshooting and is not a substitute for professional horticultural diagnosis.
The Four Most Common Beginner Propagation Mistakes
Understanding these typical common propagation mistakes is how you turn past failed propagation attempts into future success. Let’s break down where things usually go wrong.
Mistake 1: Starting with Weak or Unhealthy Parent Material
The Mistake: Taking a cutting from a plant that is already struggling, diseased, or pest-ridden. Why It Fails: A cutting is a clone. It carries all the weaknesses and stresses of its parent. If the mother plant is fighting off spider mites or a fungal infection, the cutting starts its life at a massive disadvantage, with less energy to dedicate to the taxing process of creating new roots.
Mistake 2: Using the Wrong Medium or Container
The Mistake: Sticking every type of cutting into the same dense, moisture-retentive potting soil, often in a pot with no drainage. Why It Fails: Most cuttings need a light, airy medium (like perlite, coarse sand, or sphagnum moss) that holds moisture but allows oxygen to reach the vulnerable stem. Dense soil stays soggy, smothers the stem, and invites rot. A container without drainage compounds this problem.
Mistake 3: Misjudging Water and Humidity
The Mistake: Treating an unrooted cutting like a potted plant—either keeping the medium constantly wet or letting the air around it become bone dry. Why It Fails: This is the core tension of beginner propagation problems. Too much water in the medium causes rot (Mistake #2’s partner). Too little humidity in the air causes dehydration. The cutting needs a “Goldilocks” environment: a consistently moist (not wet) base and humid air to prevent water loss.
Mistake 4: Giving Up or Disturbing Too Soon
The Mistake: Yanking the cutting out of the medium every few days to check for roots, or discarding it after just one week. Why It Fails: Root initiation takes energy and time. Disturbing the cutting damages any delicate root cells that are just beginning to form. Different plants root at different speeds; a woody herb cutting may take 2-3 weeks, while a succulent leaf may take months. Impatience is a major propagation error.
Your Safe-Start Propagation Fix Kit
Now for the solutions. These fixes are designed to be simple, forgiving, and to reduce the variables that cause most propagation troubleshooting headaches. Choose the fix that matches your diagnosis.
Fix for Rot: Switch to a Cleaner, More Observable Method
If rot is your issue, remove the variable of soil moisture entirely. For many common houseplants (Pothos, Philodendron, Tradescantia), the safest beginner fix is to switch to water propagation. Place a healthy, re-cut section of stem (cutting above the rotten part with a clean tool) in a jar of clean water, ensuring only the stem is submerged and leaves are dry. Change the water weekly. This allows you to monitor root growth directly and eliminates overwatering. For succulents, let the cut end callus over completely for several days before placing on dry soil.
Fix for Dehydration: Create a Mini Greenhouse
For cuttings that dry out, you need to trap humidity. After placing your cutting in a moist medium, cover the pot with a clear plastic bag or place a clear plastic cup over it. This creates a “humidity dome.” Open it every few days for fresh air to prevent mold. This tiny, humid environment drastically reduces water loss from the leaves, giving the cutting time to develop roots without desiccating. A simple misting bottle is not enough for many plants.
Fix for Stagnation: Optimize Light and Warmth
A healthy but root-less cutting needs the right signals. Move it to a location with plenty of bright, indirect light (never direct hot sun, which can cook it). Warmth also stimulates root growth; a spot that stays between 65-75°F (18-24°C) is ideal. Also, double-check you have a node—the little bump where leaves and roots emerge—submerged or buried. No node, no roots. If all else is correct, practice patience with a calendar reminder for 3-4 weeks out.
To build confidence fast, start with famously easy propagators. Take a single node cutting of a Pothos or Spider Plant and try the water method. Success with one plant is the best cure for propagation mistakes beginners make.
Building Propagation Confidence: What to Do Next
Propagation isn’t a test of innate talent; it’s a skill built through observation and gentle adjustment. Your past attempts aren’t failures—they’re valuable data points. The goal now is to break the cycle by changing just one variable at a time.
Choose one resilient plant you already own, like a Pothos or Tradescantia. Take one healthy cutting, apply one of the safe-start fixes from above (water propagation is a fantastic first choice), and then let it be. Observe without interfering. This single, controlled experiment will teach you more than a dozen rushed attempts.
Remember, every expert propagator has a graveyard of early cuttings. What separates them is that they learned why each one died and adapted. Your next cutting doesn’t have to be perfect; it just has to be an improvement on the last. Start fresh, start simple, and give yourself the grace to learn.